 .pdf
.pdf
Atlas cluster
|
This document is under active development and discussion!
If you find errors or omissions in this document, please don’t hesitate to submit an issue or open a pull request with a fix. We also encourage you to ask questions and discuss any aspects of the project on the Feel++ Gitter forum. New contributors are always welcome! |
The proper ressources cluster of the Research Institute Advanced Mathematics (IRMA - UMR7501).
1. Prerequisites
-
You have to own an account on the machine. External user can ask for an account if they are related to an institute research project.
-
To learn how to use the cluster, we recommend reading the official documentation
-
To use differents libraries version that match your need, the cluster uses environment modules You should familiarize first to know how to load specific softwares.
-
The cluster use slurm job supervisor. You should be familiar with job creation and job submission before going further.
We provide on the cluster Feel++ profile modules which loads all Feel++ dependencies
and that are guaranty to works!
you can type module avail 2>&1 | grep profile to list all profiles.
|
2. Atlas Feel++ configuration
The cluster mount points with different filesystems with more or less fast read/write operations.
| Mountpoint | Description | Usage |
|---|---|---|
/data/, |
Normal I/O operations (Hard Drive), |
Store your computed data |
/ssd/, |
Fast I/O operations (Solid state drives), |
Compute |
/home/, |
Slow I/O operations (NFS file system), |
Network stored data (documents) |
/ssd, /scratch, and /data/scratch and more generally
"scratch" named directories are not backup!
|
Set the FEELPP_WORKDIR environment variable to the working directory path. By default, this variable point to
export FEELPP_WORKDIR=/ssd/${USER}/feelIf your application generate an high amount of data, you should use /data/scratch/{USER}/feel instead.
| For heavy computations, please consider using one or several cluster computing nodes. See the official documentation for more information. |
3. Atlas Feel++ usage
In this section, we will learn basic usage of Feel++ on the cluster.
There are three main methods to use Feel++ on Atlas cluster. from the simplest to the hardest:
For the second methods 2., a module is used for the Feel++ library, you do not need to recompile Feel++ from the sources. The next subsections details how to prepare the cluster environment to use these three methods.
| You should also consult the Feel++ installation documentation (1., 2. and 3.) before going further. |
3.1. Using Feel++ containers on Atlas
3.1.1. Singularity (recommended)
Singularity is the recommended method for Feel++ containers.
Singularity is installed by default on the cluster.
To retrieve the current version of the singularity software, just type
singularity --version
|
For singularity container compatibility reason, you might want to use an older or newer version of singularity. Different versions are available via modules. To retrieve all available modules |
|
To get informations about a container (for example which singularity version was used to build the container), just type |
First of all, download a Feel++ singularity image from our official data management tool on the cluster. To download from the command line directly, you can use the girder webAPI using the file identifier (ID).
curl -o feelpp-toolboxes-latest.simg https://girder.math.unistra.fr/api/v1/item/5b299c97b0e9570499f67169/downloadFinally, run a shell inside the image
singularity shell -B ${FEELPP_WORKDIR}:/feel feelpp-toolboxes.simgYou are now in the container, you should have the bash prompt looking like this:
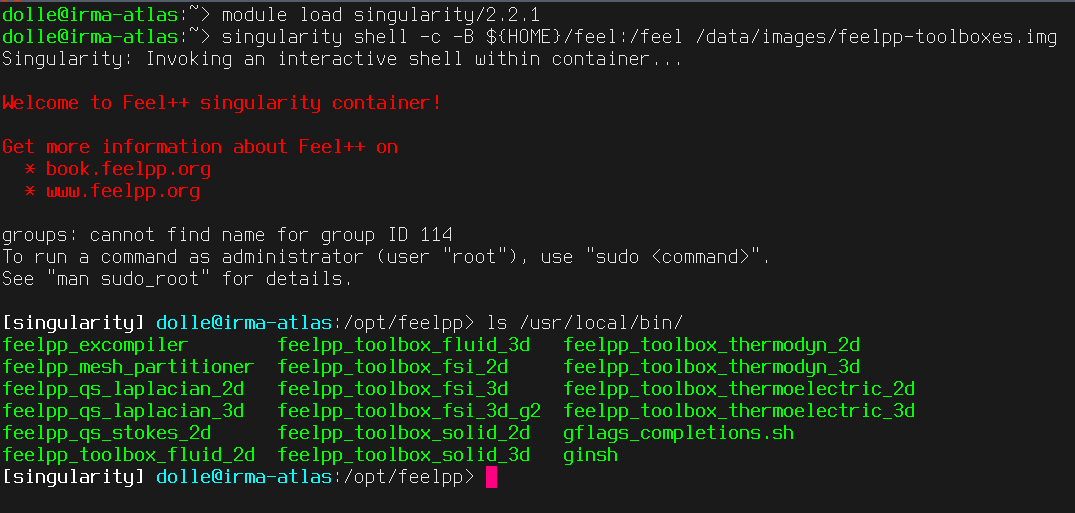
| Since singularity 2.4.0, images are immutables, thus can’t be edited. The option -B is used to mount a directory from the host inside the container. By default, singularity shares home directory from the host. |
Job slurm with Feel++ singularity containers
An example of slurm batch script using singularity.
#! /bin/bash
#SBATCH -p public
#SBATCH --export=ALL
#SBATCH -n 8
#SBATCH -N 1
#SBATCH -t 00:30:00
#SBATCH -D /data/scratch/${USER}/slurm
#SBATCH -o slurm.%j.%N.out
#SBATCH -e slurm.%j.%N.err
#SBATCH -v

source /etc/profile.d/modules.sh

mpirun --bind-to core \
    singularity exec \
    -B ${FEELPP_WORKDIR}/feel:/feel \
    feelpp-toolboxes \
    /usr/local/bin/feelpp_qs_laplacian_2d \
    --config-file=/usr/local/share/feelpp/testcases/quickstart/laplacian/feelpp2d/feelpp2d.cfg
To send the job, just run the command
sbatch myjob.slurmTo view your job
squeue -u ${USER}For more info about slurm, consult atlas wiki slurm or official slurm documentation.
3.2. Feel++ via modules
This section details an easy way to try a native installed version of Feel++. Several modules are proposed for compiled version of the Feel++ library , the toolboxes or the quickstart.
feelpp-lib/develop_gcc830_openmpi402 |
feelpp-quickstart/develop_gcc830_openmpi402 |
feelpp-toolboxes/develop_gcc830_openmpi402 |
Please find all current available modules using
module av 2>&1 | grep "feelpp-*"
|
-
Load the Feel++ library via the module.
module load feelpp-lib/develop_gcc830_openmpi402Feel++ is now available in the system
the module set the environment variable FEELPP_DIR for the path to the Feel++ installation
echo ${FEELPP_DIR}.
|
-
Load a Feel++ profile to have access to all Feel++ requirements for compiling your application.
module load feelpp.profile_gcc640_openmpi1107| The profile should be the same used for the feel++ module to avoid mismatch setup for the compilation |
| From here you can go to Quickstart section. |
-
Place yourself in a directory and create a cmake file named
CMakeLists.txtcontaining the following code.
cmake_minimum_required(VERSION 2.8)

find_package(Feel++
  PATHS $ENV{FEELPP_DIR}/share/feel/cmake/modules
  /usr/share/feel/cmake/modules
  /usr/local/share/feel/cmake/modules
  /opt/share/feel/cmake/modules
  )
if(NOT FEELPP_FOUND)
  message(FATAL_ERROR "Feel++ was not found on your system. Make sure to install it and specify the FEELPP_DIR to reference the installation directory.")
endif()

feelpp_add_application(youApplication SRCS yourCode.cpp)
This file describes to cmake how to find the Feel++ library in the given directories. By default, cmake will search in the system default path.
-
Create a C++ file named
yourCode.cppwhere you will write your first Feel++ code. -
Generate the Makefiles with cmake or using the configure script.
/path/to/feelpp-sources/configure -
Compile you Feel++ application
make
3.3. Feel++ from scratch
To compile Feel++ from scratch, just load a Feel++ profile module and follow the user manual install Feel++ from sources.
4. Post-processing
4.1. Paraview
4.1.1. Downloading the data
You can retrieve your data on you local machine using rsync.
paraviewand open the .case file
4.1.2. Distant connection (pvserver)
Open a terminal and connect to atlas server. The paraview Run the paraview server
module load paraview/5.1.0
pvserver
use pvserver --multi-clients to connect with several users at the same
time! See pvserver --help for all options.
|
On you machine, run paraview and connect to the server
[file]→[connect].
A should pop out. Configure the server
with the given address displayed in the terminal
where you run pvserver. It should looks like cs://irma-atlas:11111.
| Paraview and pvserver must be the same version! |
4.2. Containers
4.2.1. Docker containers
Feel++ provides paraview directly in the docker image.
First, you have to run a new container on atlas.
Don’t forget to mount the volume /feel for Feel++ applications.
We have to add an option to use the same network than irma-atlas
--network=host
docker run --rm -it --network=host -v ${HOME}/feel:/feel feelpp/feelpp-toolboxes:develop-ubuntu-16.10Then you can proceed with paraview server pvserver like in Distant connection (pvserver)
section.
Distant connection (In-situ)
Feel++ is compatible with insitu thanks to kitware catalyst. First be sure to follow previous steps Docker containers to run a docker container.
In the container, start a paraview server in the background.
pvserver &Keep in mind the printed address.
On you machine, run paraview and connect to this server like explained in section
Distant connection (pvserver).
Connect to catalyst via paraview menu [catalyst]→[connect]. A prompt message
should inform you that paraview accept catalyst connections.
Set catalyst to pause [catalyst]→[pause] in the menu before launching a Feel++
application.
Now in the container, chose an application you wish to execute. For example,
let’s take ~/Testcases/FSI/wavepressure2d Run your application with insitu
options.
mpirun -np 8 feelpp_toolbox_fsi_2d --config-file wavepressure2d.cfg --exporter.format=vtk --exporter.vtk.insitu.enable=1The simulation will stop after the initialisation step waiting for you to resume catalyst.
Click on the icon to expand the object, then click on the "eye" icon to make the object visible.
At this time, you can add all filters as usual for post-processing.
Once you’re ready, resume catalyst [catalyst]→[continue]